Example
Let’s pretend you want to resize your partitions in order to lend some space from your internal storage to the System and Data partitions.
1. So, the first thing you should do is reboot your device into “Recovery mode“.
2. Once there, open up your CLI (Command Line Interface) tool such as Terminal or CMD and issue:
“adb root” – in order to start adb as root user.
Then, “adb shell” – in order to access the device shell.
Note: as mentioned on the previous page, you may need to specify the full path to adb, e.g: C:\Program Files(x86)\Android\android-sdk\platform-tools\adb root.
3-a. Next, use “ls” command to see the files inside the root file-system directory, and then check whether parted is installed by issuing parted command.
In my case (image below), upon issuing “parted” I got a “not found” error. However, since partitioning my device in the past, I know that my partition table uses GPT table – therefore parted is a necessity for me.
3-*. It may be a good idea to also check what tools are available to you on the device itself, so you might want to list the files inside sbin directory: ls sbin.
3-b. In case you don’t have parted pre-installed on your device, you may download parted from this guide (see previous page), then exit the shell by typing exit.
After downloading and extracting parted, use adb push to get parted inside your device like so: adb push PATH/TO/PARTED /.
Enter the shell again using adb shell.
Issue ls again to make sure parted is there.
* Tip: If you’re unsure about your device partition names, you can use a command that shows them: cat /proc/partitions.
As you can see, there’s mmcblk0 – which is the main block where all the partitions are stored.
And there are 12 partitions in total which uses the name format “mmcblk0” plus “p” and a number that represent them, such as: mmcblk0p1, mmcblk0p2, etc…
Blocks lie inside /dev directory in Linux (yes, Android is a variation of Linux). We will use the block we’ve found in order to re-partition the device.
4. In order to make sure you give parted the right parameter, go inside /dev directory: cd /dev.
And use find command to find the exact location of mmcblk0: find -iname mmcblk0.
Don’t forget to change parted user permissions by issuing: chmod 764 /parted – which gives you a permission to execute the program.
5. Finally, issue: /parted block/mmcblk0 (switch mmcblk0 with your device’s block name) to start the partitioning tool. (If you’re not inside /dev directory then use absolute path: /parted /dev/block/mmcblk0)
Use “p” to list the partitions inside parted.
Type “help” to see the commands available to you.
6. Since parted executes commands on the fly, from now on be super-careful regarding any command you issue!
A short explanation regarding the relevant partitions:
- Partition number 9 labeled FACTORYFS – is the “system” partition where all the operating system files are stored in.
- Number 10 – DATAFS – is the “data” partition where all applications usually save their data.
- Number 11 – UMS (USB Mass Storage) – is the internal storage partition where all the stuff such as: pictures, videos, etc, are stored in.
To resize those, you’ll have to delete them all and then assign different sizes – this is where a backup might become handy (I recommend copying all the files to your computer prior to erasing any partition).
After erasing and re-partitioning the available space, you should re-label the partitions with the same names (for compatibility sake) and create file systems (I prefer using ext4, however, if your device came with other specific file systems, it might be a good idea to stick to those).
So, how do we do it?
Here’s the sequence of commands with a following explanation:
(parted) rm 9
(parted) rm 10
(parted) rm 11
Will delete FACTORYFS, DATAFS and UMS respectively.
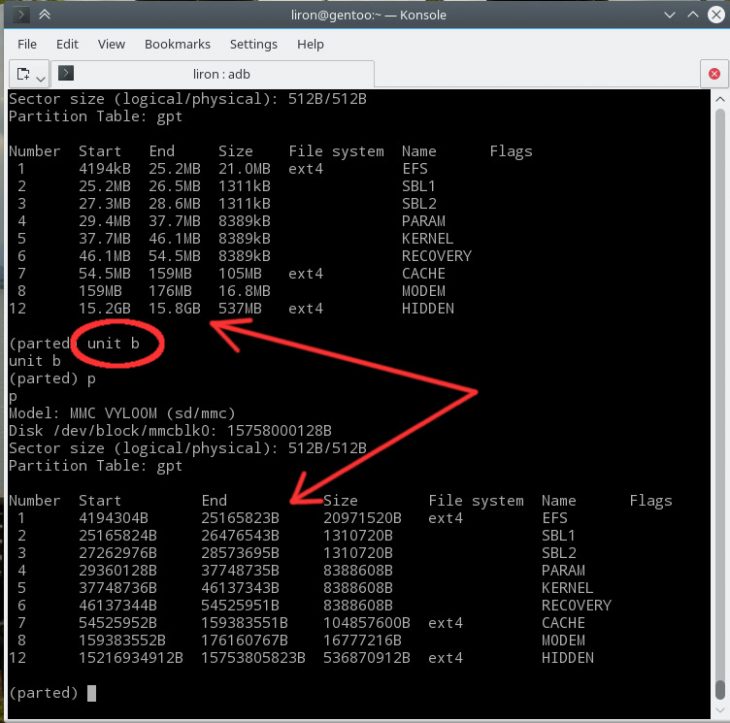
(parted) unit b
Change the unit to bytes in order to be accurate as possible (for optimum sake).
(parted) p
Redisplay the partition table, this time showing size in bytes.
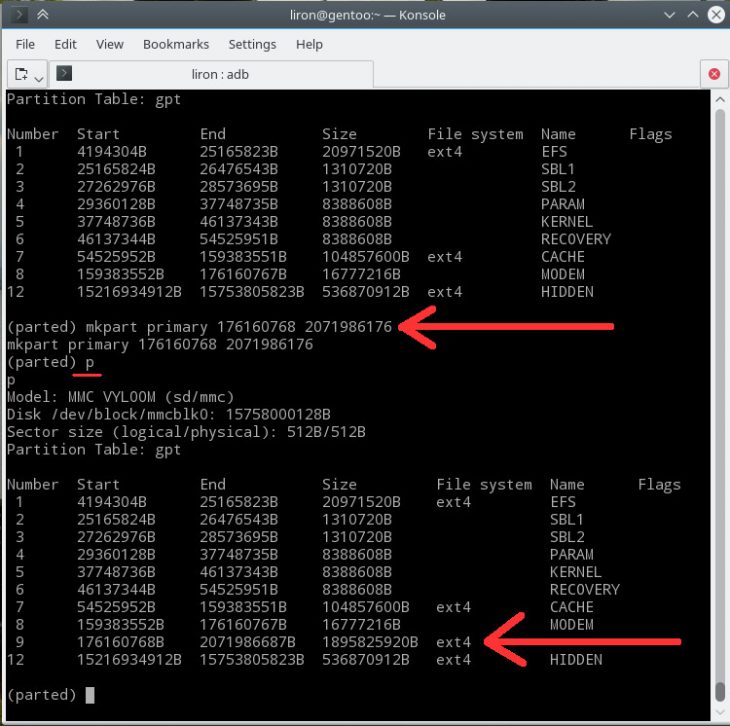
(parted) mkpart primary 176160768 2071986687 [the first number is one byte bigger then the ending number of the previous partition which in this case is 8, the second number minus the first will determine the final size of the partition]
(parted) mkpart primary 2071986688 4456448511
(parted) mkpart primary 4456448512 15216934911
Creating the three partitions again after deleting them previously.
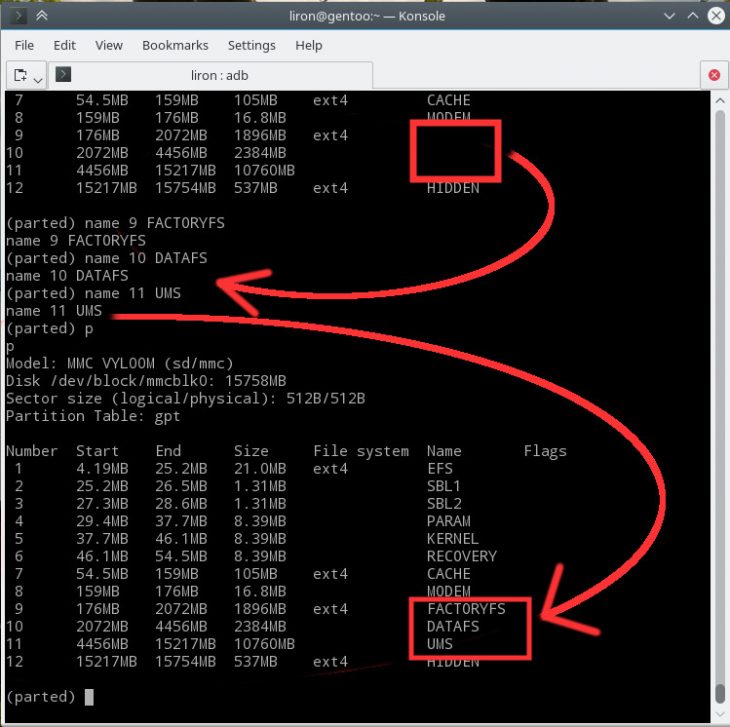
(parted) name 9 FACTORYFS
(parted) name 10 DATAFS
(parted) name 11 UMS
Will re-label the partitions.
(parted) unit mb
(parted) p
Check to see that your partitions are having the size you wanted and then quit.
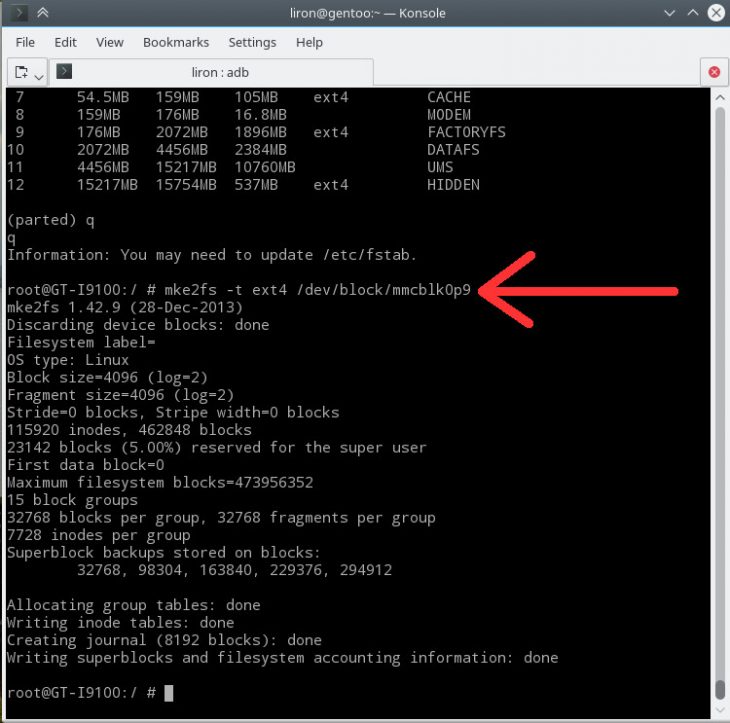
(parted) quit
Exit parted.
mke2fs -t ext4 /dev/block/mmcblk0p9
mke2fs -t ext4 /dev/block/mmcblk0p10
mke2fs -t ext4 /dev/block/mmcblk0p11
Assign ext4 file system type to each of the newly created partitions.
7. Lastly, while still in “recovery mode”, re/install the system files (using the device recovery options) and only then it should be safe to reboot the device.
Tip: adb sideload command might be useful at this point.


